Attendees & Orders
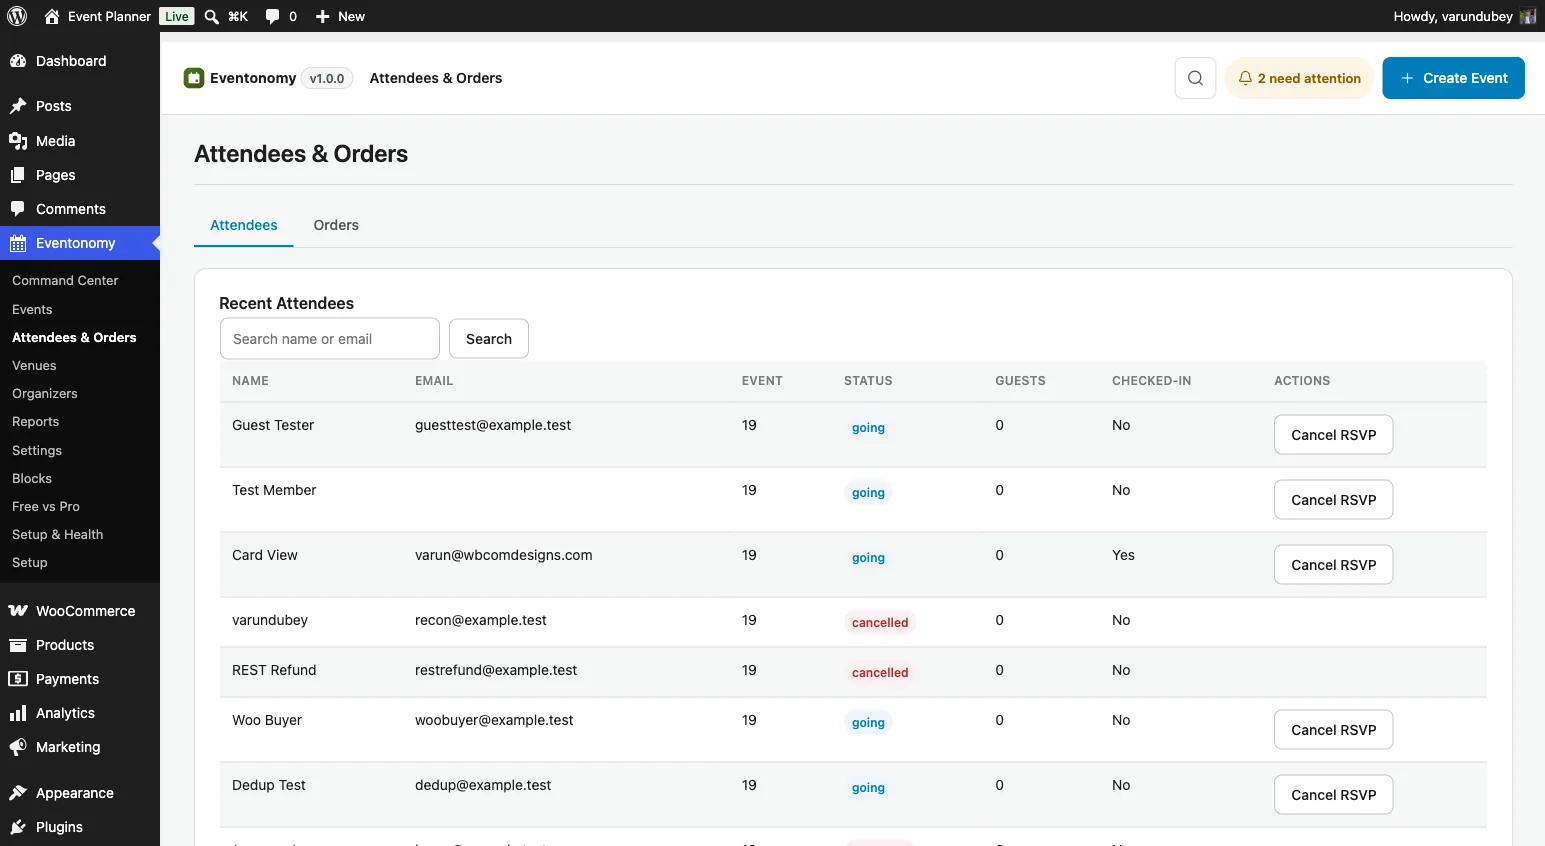
The Attendees & Orders screen gives you a full view of who is coming to your events. You can filter by status, search by name or email, check attendees in, and manage RSVP and order records.
What You Will Learn
- How to view and filter attendees for an event
- How to manage RSVP status from the admin
- How to check attendees in (Pro)
- How to view orders, refund them, and export records
- What a buyer receives after an order (confirmation card, email, invoice)
Viewing Attendees
Go to Eventonomy → Attendees & Orders. Use the Event filter to scope the list to a specific event.
For each attendee you see:
- Name - the member's display name or the guest name they submitted.
- Email - the member's email or the guest email. Guest emails are visible only to event organizers and admins.
- RSVP status - Going, Maybe, No, or Waitlist.
- Party size - 1 (the attendee) + any additional guests.
- Checked in - whether they have been checked in at the door (Pro).
- Registered - when the RSVP or order was created.
Filtering Attendees
| Filter | Options |
|---|---|
| Event | Select a specific event |
| Status | Going, Maybe, No, Waitlist |
| Check-in | Checked in, Not checked in (Pro) |
| Search | Match on name or email |
| Occurrence | Scope to a specific date (recurring events) |
With No Event Selected
Eventonomy → Attendees & Orders opens site-wide: every attendee across every event, newest first. That is the intended landing state, not an error - use the event filter to narrow to one event when you need to.
Two things follow from it:
- Export CSV with no event filter exports everything, across all events. Pick an event first if you wanted just that one.
- An empty table means there are genuinely no attendees yet, and says so ("No attendees yet"). Searching with no matches says something different ("No attendees match ..."), so you can always tell an empty site from an empty search.
The front-end Manage Attendees block behaves differently on purpose: it manages exactly one event, so opening it without one shows "Choose an event first" and sends you to My Events. See Manage Attendees block.
Managing RSVP Status
Organizers and admins can change an attendee's RSVP status directly from the admin:
- Find the attendee in the list.
- Click the RSVP status badge or the Edit action.
- Select a new status and save.
Changing an attendee from Going to No frees a spot and automatically promotes the next person on the waitlist.
Bulk Actions
Both the Attendees and Orders tables have checkboxes with a bulk toolbar:
- Attendees - mark selected RSVPs Going, Cancel them, or Resend the confirmation email. Capacity is respected: marking someone Going on a full event skips that row with an "event full" note, and cancelling goes through the normal path so waitlist promotion still fires.
- Orders - Cancel selected orders.
The result line spells out exactly what happened, e.g. "2 updated, 1 skipped (already cancelled)."
Emailing Your Attendees
To send a message to everyone registered for an event (a room change, parking note, schedule update), use the Email attendees panel in the event's Manage Attendees view; see How to Message Your Attendees.
Door Check-In (Pro)
Pro - Check-in requires Eventonomy Pro.
Every attendee ticket carries a QR code; door staff scan it with any phone camera to check the attendee in, and the manual eventonomy-pro/checkin block is available as a fallback. Check-in status appears in the Attendees & Orders screen in real time. See Check-in Scanner.
Orders
The Orders tab shows all order records. An order is created when an attendee completes registration: a Free/$0 order, or a paid order via a Pro gateway.
Order Statuses
| Status | Meaning |
|---|---|
pending |
Created but not yet paid (paid orders awaiting gateway settlement). |
paid |
Payment confirmed (or a $0 order); attendee tickets have been generated. |
cancelled |
Order was cancelled. |
refunded |
Payment was fully refunded (Pro). |
failed |
Payment failed. |
Free ($0) orders are created as paid immediately.
Order Actions (Free)
Each order row offers status actions:
- Mark as paid - on a
pendingorder. Use it when payment arrived outside a gateway (bank transfer, cash at the door). Marking paid generates the attendee tickets exactly as a gateway settlement would. - Cancel - on a
pendingorpaidorder. Cancelling releases the reserved ticket stock and voids the order's attendee RSVPs. For an order that was paid through a gateway, the confirm dialog warns that cancelling does not refund the payment; use Refund (Pro) for that.
An order can never be flipped to refunded by hand: that status is reserved for the Pro refund flow and gateway webhooks, so the money trail always matches.
Refunding an Order (Pro)
Pro - Refunds require Eventonomy Pro.
Each paid order with a gateway has a Refund button in the Orders table (two-step inline confirm). The button always refunds the whole order: there is no amount to enter. Refunding flips the order to refunded, releases the ticket stock, voids the attendee tickets, and releases any coupon use. The same full-order refund is available over the REST API, and a refund you issue in your gateway's own dashboard is reconciled back automatically. See Refunds & Cancellations.
What the Buyer Receives
After a successful order, the buyer gets:
- An order-confirmation card on their member dashboard (the landing page every gateway redirects to) showing "You're registered," the order details, and a per-attendee QR ticket.
- An order-confirmation email (sent for paid and Free/$0 orders).
- A downloadable PDF invoice (
?evnm_invoice=<id>). - Guest retrieval - buyers without an account get a per-order access token so they can reopen their receipt and invoice without logging in.
Filtering Orders
Filter by event, status, date range, or search by email or name.
Order Numbers
Orders are numbered with a configurable prefix (e.g. ORD-10001). Set the prefix at Settings → Payments → Orders → Order number prefix.
Frontend Organizer Sales View
Member authors who have no wp-admin access still get a Sales panel above the attendee table in the Manage Attendees block: four stat cards plus a recent-paid-orders table (gated on the event-scoped manage_orders capability). With Pro active, the panel also shows the organizer's net earnings and the platform fee for the event, provided vendor earnings are switched on (see Earnings & Payouts).
The four stat cards are:
| Stat | What it counts |
|---|---|
| Revenue | Total of all paid orders for the event, in your store currency. |
| Paid orders | How many orders reached paid status. |
| Seats taken | Headcount. The registrant plus every guest they are bringing. |
| Registrations | Registrations. One per person who signed up, no matter how many guests they added. |
Why "Seats taken" and "Registrations" Show Different Numbers
This is expected, not a bug. The two cards deliberately answer two different questions:
- Seats taken answers "how many bodies will be in the room?" A registration for one person bringing three guests adds 4 to this number.
- Registrations answers "how many sign-ups do I have?" That same registration adds 1.
So an event with 7 registrations where a few people brought a guest each will read Seats taken 10 and Registrations 7. Use the headcount for catering, seating, and capacity; use the registration count for follow-up and admin work.
A third number can appear in the Email attendees panel on the same screen. Its Send to selector reads Going (5) or Going + waitlist (6) - those counts are registrants, because an email goes to the person who registered, not to each guest they bring. That number will normally be lower than the Seats taken headcount, and it can also differ from Registrations because it is scoped to the status you picked. All three are correct at the same time.
Export to CSV
Eventonomy exports to a UTF-8 CSV (with CSV-injection protection built in):
- Attendees - the Export CSV button on the admin Attendees table. With an event selected it exports that event's attendees; with no event filter, admins get a site-wide export across all events. Organizers can also export their own event's list from the frontend Manage Attendees view.
- Orders - the Export CSV button on the admin Orders table.
Attendee CSV Columns
The attendee export always writes these six columns, in this order:
| # | Column | What it contains |
|---|---|---|
| 1 | Name | The attendee's name as submitted on the registration form. |
| 2 | The attendee's email address. | |
| 3 | Status | The RSVP status: Going, Maybe, No, or Waitlist. |
| 4 | Guests | Additional guests only, not counting the registrant. A row reading 3 means four people. |
| 5 | RSVP Date | When the registration was created. |
| 6 | Event Title | The event this registration belongs to. |
After those six, one extra column is added for each registration question, using the question's own label as the column heading. Checkbox questions export as Yes or No; every other type exports the answer text. If you have no registration questions set up, the file has exactly six columns.
Which questions get a column depends on the scope of the export, and this is expected rather than a bug:
- Exporting one event - only the questions that event asks. An event that unticked a question has no column for it.
- Exporting site-wide - every question in the bank, so rows from different events line up in one file.
The admin attendee table shows its question columns on the same rule. So two exports from the same site can legitimately have different column counts.
The Event Title column is filled in for every row even in a site-wide export. As of 1.3.0, if a registration belongs to an event that has since been deleted, the column shows # followed by the event's ID (for example #412) instead of being left blank, so an old row can still be traced back to the event it came from.
What's Next?
Configure the different ways visitors can browse and discover events.